Showing posts with label DSP. Show all posts

Wednesday, October 11, 2017

Quick and easy Halloween treats!

Do you like dressing up your candy for Halloween too? Then check out these cute ideas!

 They all use items for the Spooky Night Bundle, and a few extra things like Gusseted Bags and Treat Tubes.
 This one here used a 6"x 6" piece of Spooky Night DSP, Vintage Crocheted Trim, Black Rhinestones, 2" Circle Punch, Everyday Label Punch, Some Pumpkin Pie and Very Vanilla cardstock, and Pumpkin Pie and Memento Black ink. It took next to no time and can hold a pack of Chiklets inside.

 You can't go wrong with a little box full of treats at your Halloween party! This is made with a strip of Spooky Night DSP wrapped around a box made from Pumpkin Pie cardstock, with the pumpkins cut directly from another sheet of DSP from the same pack. You can cut them with your Paper Snips or the Patterned Pumpkins Thinlits Dies. A Gusseted Bag filled with Candy Corn and tied of with some Pumpkin Pie Stitched Ribbon sits inside.

 This one is the cat's meow! It's just a 3"x 6" piece of Spooky Night DSP folded at 1 1/2" at the top stapled to a partially filled Gusseted Bag. I wrapped some Vintage Crocheted Trim around it and tied it in a knot to cover the staples. The cat is stamped from the Spooky Cat stamp set onto Pumpkin Pie cardstock, and punched with the cat punch. The Trick or Treat is stamped on a scrap of Very Vanilla cardstock and the end are just trimmed with scissors. The cat and greeting are both popped up with Dimensionals.
This one is the easiest and most fun! I filled a Treat Tube with Reece's Pieces, then used the Everyday Label Punch with some Spooky Night DSP to make the base for my tag. I punched a little hole near the top to be able to tie it on. Then I stamped the greeting in Pumpkin  Pie ink onto Very Vanilla cardstock and punched it with a 1" Circle Punch. There is a Basic Black 1 1/4" circle punched out too. I put a little Black Rhinestone on there and tied to to my Treat Tube with some Basic Black Solid Baker's Twine.

Here is a complete list of all of the items I used on these treats. A video tutorial for each one will post within the next two weeks, so be sure to check back here, or follow me on YouTube to see them all!


Monday, June 5, 2017

New Ribbon and Designer Series Paper SHARE!


The new catalog is FULL of beautiful new designer papers and ribbons, and I want them ALL!!  So, I'm doing some product shares so "we" can get them all!  It's a great way to get a sampling of everything so you can decide what you really, really like!

Here are the details:

Collect 49 new ribbons

and 66 new designer papers!

Ribbon Share: 49 yards of Brand New ribbons!! Only $42.50 plus $6 shipping!  Or you can pick it up from me for no shipping cost!
You would spend over $400 to purchase each of the new ribbons!  This way you can "try before you buy"!

Each ribbon share needs 10 people.  As soon as I have ten I will start a NEW rsvp link for group 2 and so on.  So, if it says the event is full, contact me for the new link!
If we don't have enough participation your payment will be refunded.
BONUS: Receive a FREE roll of new Baker's Twine!


Designer Series Paper Share: 66 sheets of 6x6 Designer Series Paper from the New Catalog! Only $21 plus $6 shipping!  Or you can pick it up from me for no shipping cost!
You would spend over $150 to purchase each of the new 12x12 designer papers!  This way you can "try before you buy"!

Each paper share needs 8 people.  As soon as I have 8 I will start a NEW rsvp link for group 2 and so on.  So, if it says the event is full, contact me for the new link!
If we don't have enough participation your payment will be refunded.
BONUS: Receive 20 sheets of 6x6 retired designer paper!  (*Variety will vary per person.)

Click here to reserve your spot in the paper share!

**If you sign up for BOTH SHARES, only choose the shipping on ONE - I will combine them into ONE packet for you!!**

Monday, August 3, 2015

July Paper Pumpkin Alternate Projects

I wanted to post these pictures before I forgot all about them! These products are so cute. I especially love them because I'm a big tea and coffee drinker myself. I mean, who isn't really?


So here is how the kit was intended to be used. A cute little card with a little teacup, and maybe even a little succulent inside. The two-step stamping was so easy with the photopolymer stamps. Just stamp the Early Espresso outline, and then stamp the Cucumber Crush on the inside!


For this card I added a little extra cardstock in Pumpkin Pie and Cucumber Crush behind it. Then I stamped the teacups and the sentiment, and popped them up with dimensionals. The little pennant on the side is made with the stickers that cam in the kit. I trimmed the orange one down a little after layering it on the gray, then added the bow clip. So cute and so easy!


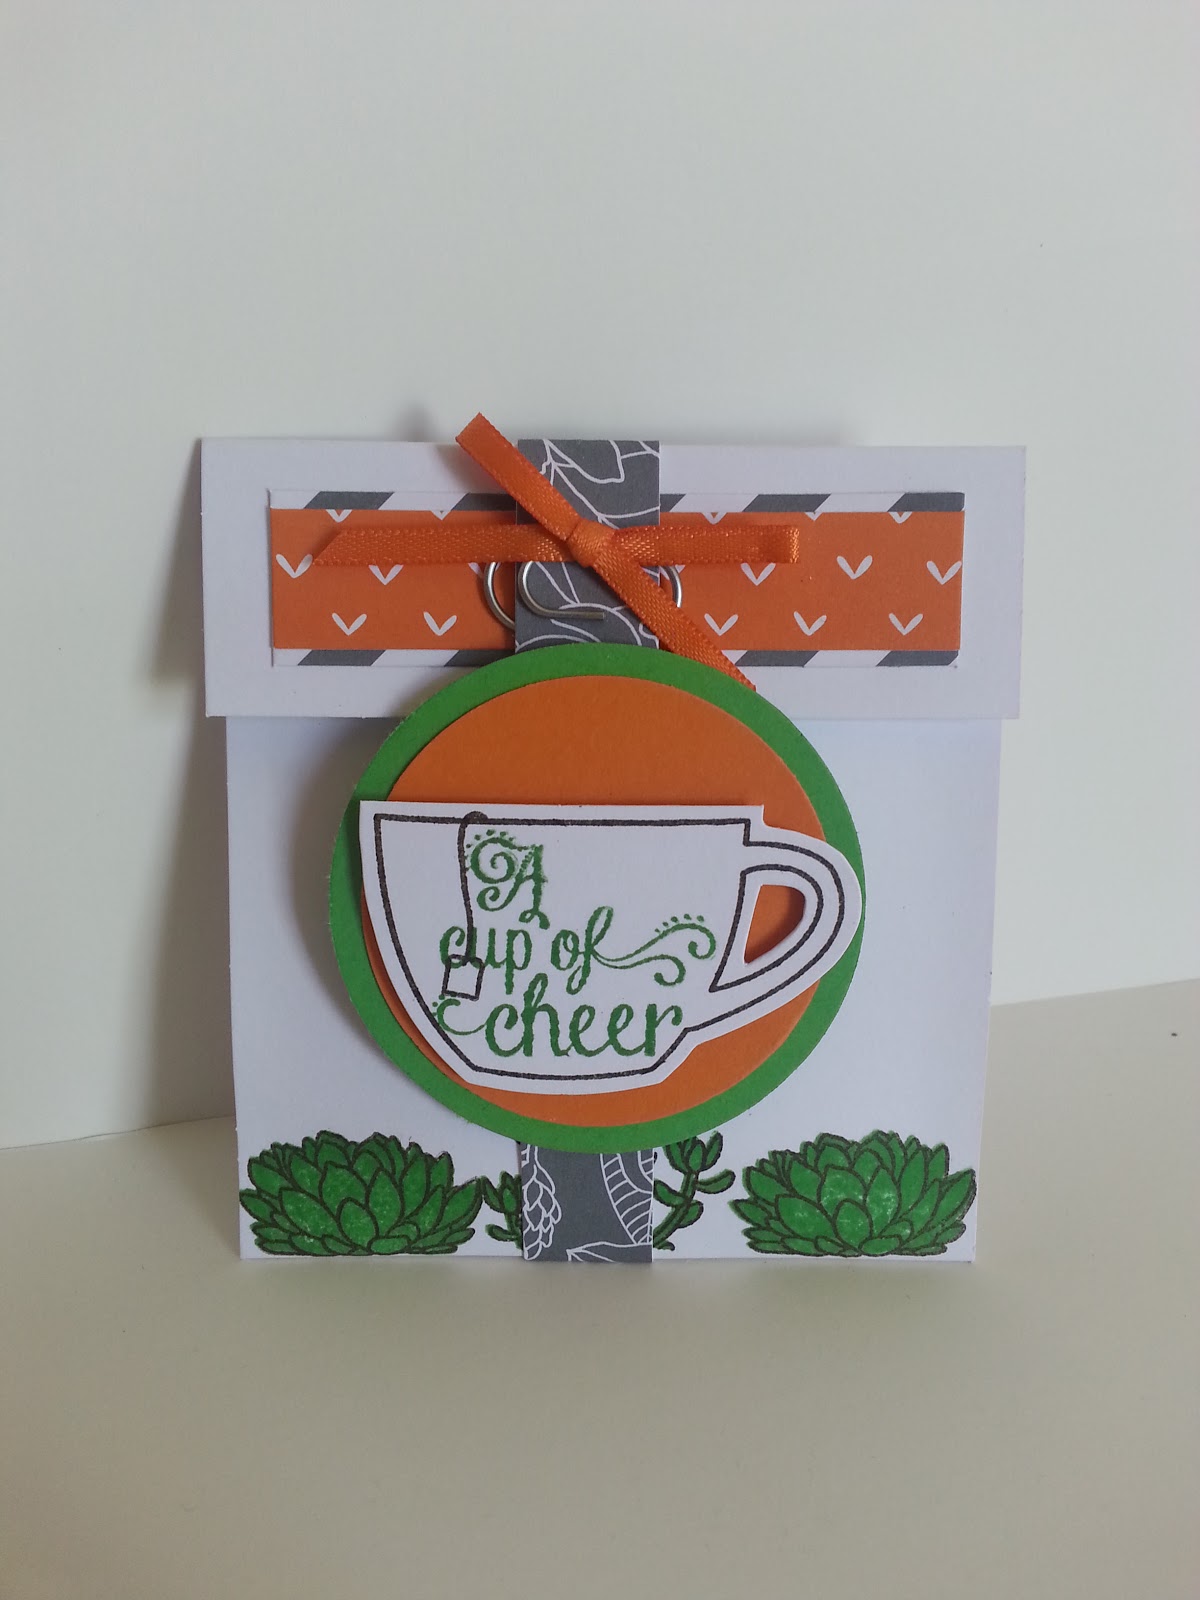
I made this cute little gift pouch with a card base. I just trimmed it down, scored the top flap and the bottom fold, and closed up the sides with some snail. After that I just stamped the succulents, put the tea cup onto two punched circles, and attached that to a 1/2" wide strip of the Designer Series Paper to make a belly band. Doesn't it looks so nice with my favorite tea?


Now that we've made a little tea gift, it's time for coffee gift! I made this box by cutting down a card base again, doing a little scoring, and just folding it up to make a little box. After folding it, I added some of the included Designer Series Paper to the front and the little teacup saying Thanks a Latte. The coffee is in one of our gusseted bags that I tied shut with Whisper White Baker's Twine and added the little bow clip over it.

Aren't these little Project Life cards darling? I just love the little tea cup with water coloring behind it. I just took my Aqua Painter, swiped it through some Cucumber Crush ink, and painted it on the card and little tea tag. I did the same kind of thing to make my tea rings! I just tapped a plastic cup in my Early Espresso ink and pressed it onto to the card, then painted over it with the Aqua Painter. These little cards are sure to make any album very cheerful!


Thanks for stopping by to check out what I did with July's Paper Pumpkin Kit!
Happy Stamping,
Jessica

Thursday, January 8, 2015

Sale-A-Bration is here!


What is Stampin' Up!'s Sale-A-Bration?

It's only the biggest sale of the year!!

There are THREE AWESOME BENEFITS during Sale-A-Bration - January 6 through March 31, 2015.

1. FREE gift with every $50 spent, no limit!!  Spend $100 get two, and so on!
2. TWO FREE GIFTS when you purchase the Starter Kit!!  Or, you can choose one project kit from the Occasions Catalog!  The kit is $99 and you choose $125 in ANY current merchandise you want!
3. $25 MORE in FREE merchandise when you host a qualifying party!

Don't delay!!  Book your home party with me now!  I will come do all of the work, you get the benefits!  Plus, you and your friends get to make some cute projects!  I have many different types of parties to choose from.  Free parties, private classes brought to you, memory keeping class, and more!  Ask me for more info!

And, if you are thinking about getting the Starter Kit, GET IT NOW so you can take full advantage of Sale-A-Bration as a demonstrator - discount, earning extra income, and more!

Here are some samples from the Sale-A-Bration Set, Lotus Blossom.  Most are inspired from Pinterest!


Wednesday, September 10, 2014

September Stamp of the Month!

It's time for the new Stamp of the Month! Cheerful Christmas!


I love this set. It coordinates with the Nordic Noel Designers Series Paper,  Nordic Designer Buttons, and looks adorable with the Holiday Home set.

Have you heard about my Stamp-of-the-Month club? Here's a little summary about how it works...
You'll Love Stamp-of-The Month Classes
  • Stamp Set of the Month: A brand new Clear Mount stamp set valued between $16.95-$19.95
  • Class Kits Include—A featured stamp set and hand stamped, completed projects to inspire you! The number of projects may vary. Envelopes are always included for cards. Plus, you'll get a full color photo and list of supplies for each project (including measurements) so you can use your own cardstock and supplies to duplicate the cards at home.
  • Local Classes—If you're in the area, you can attend my local monthly class time. We'll make the projects in the kit, using my ink, punches and Big Shot! It is the last Saturday afternoon of the month, the same time every month, making it easy to write on the calendar.
  • Class-To-Go Kits—If you're not in my area, or can't make it to the class, order a Class-To-Go Kit and make the projects on your own, at your convenience! Just add $5.00 for shipping and your kit will come to your door. For US residents only.
  • Easily Build Your Collection—Along with the featured set, you'll often get additional tools or accessories that can be used on future projects.
  • It's A Great Value—Stamp of the Month costs $25/month. Each month you get a brand new Clear Mount stamp set, plus the class projects on top of that! It is not a club, just a monthly kit that you can opt in to each month. But, when you participate in 4 consecutive months, you'll get $5 off the 5th month! Wow!
  • Class Options—You'll often have an option to upgrade to include more coordinating products at a discounted price! And, if you're a demonstrator, you can purchase the class cards only!
  • Substitutions—If you already have some of the products in the kit, or need some of the supplies listed for the projects, such as ink or clear blocks, let me know and I'll adjust the price accordingly.
  • Stamp of the Month orders do not count toward other classes, clubs or event orders. 
Want to get this months Stamp of the Month? Just fill out the contact form on the left with "Stamp of the month Club" in the comments and I will email you what to do next! Easy!

Tuesday, July 29, 2014

Don't forget this week's deals!

Here are this weeks's deals! Hop on over to my website to take advantage before they are back to regular price on the 5th.


Through the end of July you can build your stache of Designer Series Paper at a discount! I mean, who doesn't like free paper? I definitely took advantage of that! Shop my online store and get yours before it's too late!


Also,

That's right! You can get your first two kits for 50% off through September 10th! Not only that, but you will get an extra kit and storage case for your stamps and ink from me. So, that's like 3 kits for the price of one! Just go to www.mypaperpumpkin.com to learn more and use the promo code HALFOFF2 to get your awesome kits in the mail started! Be sure to put my name in the demonstrator box!

Saturday, July 26, 2014

Greeting You Card Kit Refashions


Hey there! So I went to an event my upline put on and she used the Greeting You Card Kit
and the Gold Soiree Designer Series Paper for some of our projects. This kit used just as it was intended is adorable; I love the envelopes! And the DSP is beautiful with the gold on it. But check out what me made with it!

Isn't this bag adorable? We used the cards and tag from the kit, cutting it at the score marks and then layering them. The tag we stamped and punched a hole in it so we could tie it to the bag. I just love the DSP on the back ground. It's cut to the exact size of the front of the bag, and then the adhesive is applied to the very edges so the corners don't roll up. The Silicone Craft Sheet made it very easy to do that without making a mess all over the table.

The envelopes in use! But not as regular envelopes, they are a brag book! They are stapled together with a heavy duty stapler, it was too thick for a regular one.  Then we used the DSP on the pages and different cute stamps throughout. I love it and can't wait to put some pictures in it. 


Isn't this one pretty? I love the gold accents and the thin strip of DSP. Sometimes less really is more.


How cute is this one?! I'm beginning to really like large sentiment stamps. All you need is a printed background, a solid color to stamp on, and you're done!


That sentiment cracks me up. What a great way to say someone is awesome and appreciated. And he sequin stamp is adorable! A little bit of metallic embossing powder and you would have sequins that won't go anywhere!

Ahh, Blackberry Bliss and gold, what a beautiful combination. The DSP made this card, in my opinion. That is one great thin about DSP, it is an easy, pretty background in seconds!